Ruby On Rails5.2のインストール
公開日:2018-06-21 更新日:2019-05-14
1. 概要
Windows版の Ruby のインストールから Ruby On Rails 5.2 の新規プロジェクトの作成までを行います。
2. Ruby のインストール
RubyInstaller for Windows にアクセスします。
Downloads ページの WITH DEVKIT の Ruby+Devkit 2.4.4-1 (x86) をクリックしてインストーラーをダウンロードします。
最新版は Ruby+Devkit 2.5.1-1 (x86) でしたが、sqlite3 とのバージョンの関係でエラーが出たため、1つバージョンを落としています。
Rails を使わないのであれば、最新版を使っても問題ありません。
インストーラーをダウンロードしたら実行します。
基本は次へ次へで問題ありません。
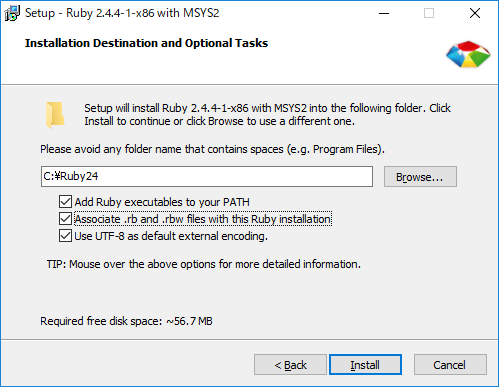
途中(下の画面)で .rb と .rbw ファイルの Ruby への関連付けと、デフォルトの文字コードを UTF-8 にするかを選択する箇所があります。
今回は全てチェックしました。
インストールが完了すると、自動的に次の画面が表示されます。
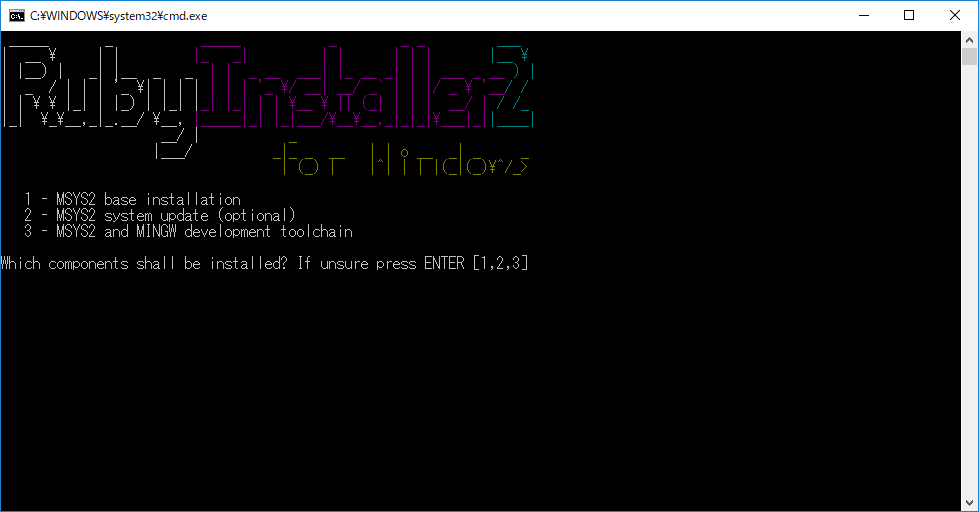
1、2、3 を全て実行します。終わったら Enter を押して終了します。
コマンドプロンプトで、
Downloads ページの WITH DEVKIT の Ruby+Devkit 2.4.4-1 (x86) をクリックしてインストーラーをダウンロードします。
最新版は Ruby+Devkit 2.5.1-1 (x86) でしたが、sqlite3 とのバージョンの関係でエラーが出たため、1つバージョンを落としています。
Rails を使わないのであれば、最新版を使っても問題ありません。
インストーラーをダウンロードしたら実行します。
基本は次へ次へで問題ありません。
途中(下の画面)で .rb と .rbw ファイルの Ruby への関連付けと、デフォルトの文字コードを UTF-8 にするかを選択する箇所があります。
今回は全てチェックしました。
インストールが完了すると、自動的に次の画面が表示されます。
1、2、3 を全て実行します。終わったら Enter を押して終了します。
コマンドプロンプトで、
ruby -v
3. Rails のインストール
Rails をインストールするには、Ruby のパッケージ管理ツールである gem(ジェム) を使います。
コマンドプロンプトを起動して、次のコマンドを実行します。
インストールが完了すると、C:\Ruby24\lib\ruby\gems\2.4.0\gems 配下に、パッケージが作成されます。
また、次のコマンドで確認することもできます。
コマンドプロンプトを起動して、次のコマンドを実行します。
gem install rails
インストールが完了すると、C:\Ruby24\lib\ruby\gems\2.4.0\gems 配下に、パッケージが作成されます。
また、次のコマンドで確認することもできます。
gem search --local rails
または
gem search --local
4. 新規プロジェクトの作成
好きな場所にプロジェクトを入れるためのフォルダを作成します。
今回は c:\RubyOnRails を用意しました。場所、名前は任意です。
次に、下記のコマンドを実行すると、rails_test と言う新規プロジェクトが作成されます。
(test と言う名前で作ろうとしたら、エラーが出ました)
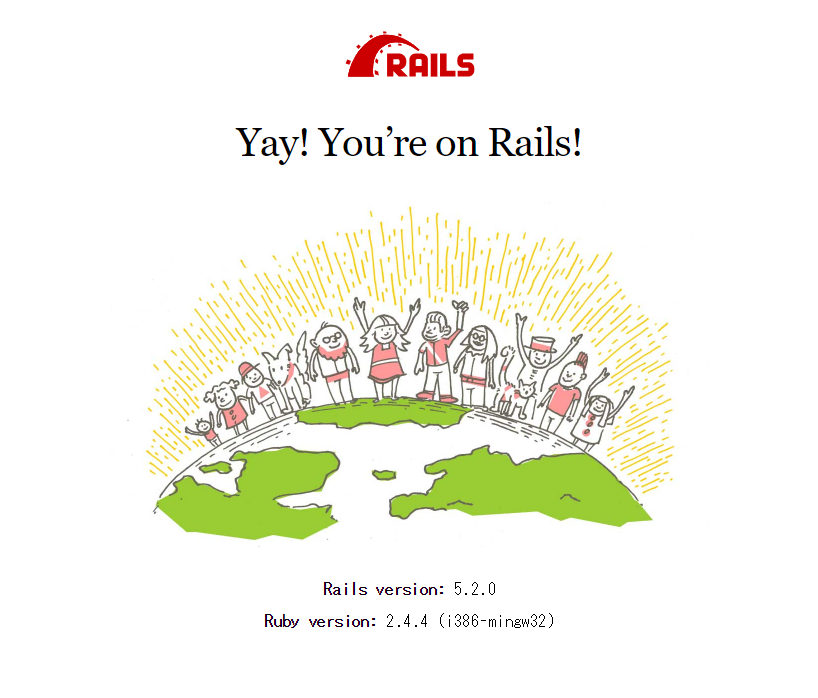
次に、以下のコマンドを実行して、Webサーバーが起動します。
今回は c:\RubyOnRails を用意しました。場所、名前は任意です。
次に、下記のコマンドを実行すると、rails_test と言う新規プロジェクトが作成されます。
(test と言う名前で作ろうとしたら、エラーが出ました)
cd C:\RubyOnRails
rails new rails_test
次に、以下のコマンドを実行して、Webサーバーが起動します。
cd C:\RubyOnRails\rails_test
rails server
5. 画面の雛型の作成
以下のコマンドで、DBのテーブル定義と、MVC一式の雛型を作成できます。
cd C:\RubyOnRails\rails_test
rails generate scaffold articles data1:string data2:string
以下のコマンドを実行します。
rake db:migrate
この DB は SQLite の DB です。
SQLiteの公式サイトの Download ページの、
Precompiled Binaries for Windows の sqlite-tools (sqlite-tools-win32-x86-3240000.zip) を使って、DB の中身を確認することができます。
以下の例では、解凍した sqlite3.exe を DB の場所にコピーして実行しています。
C:\RubyOnRails\rails_test\db>sqlite3 development.sqlite3
SQLite version 3.23.1 2018-04-10 17:39:29
Enter ".help" for usage hints.
sqlite>
sqlite> .tables
ar_internal_metadata  articles              schema_migrations
sqlite> .schema articles
CREATE TABLE IF NOT EXISTS "articles" ("id" integer PRIMARY KEY AUTOINCREMENT NOT NULL, "data1" varchar, "data2" varchar, "created_at" datetime NOT NULL, "updated_at" datetime NOT NULL);
sqlite> .quit

C:\RubyOnRails\rails_test\db>
http://localhost:3000/articles/ にアクセスして、雛型アプリが表示されれば完了です。

一覧表示、追加、更新、削除ができます。
6. 各ファイルについて
1. config/routes.rb
resources :articles としか書いてありませんが、これで雛型のコントローラーのアクションに対応する7つのルートを作成しています。
ソース中に see http://guides.rubyonrails.org/routing.html と書いてあり、こちらのページで詳細を確認できます。
ソース中に see http://guides.rubyonrails.org/routing.html と書いてあり、こちらのページで詳細を確認できます。
2. app/controllers/articles_controller.rb
コントローラーです。
2行目の before_action で、show、edit、update、destroy の時に、66行目の set_article が実行され、@article にデータが入ります。
そのため、12行目の show では何も行っていません。また、ビュー側では、コントローラーの @article が直接参照できます。
27行目の article_params は、変数ではなく、71行目で定義されているメソッドです。。
29~37行目は、do ~ end は respond_to() の引数になります。無名関数を respond_to() に渡していると思ってください。
「|」に挟まれた format は、respond_to() の中から呼ばれる際の引数です。
format.html と format.json は、ファイル名っぽいですが、format オブジェクの html() を実行しています。
メソッド名が toHtml とかだと、括弧が省略されていてもわかりやすいと思うのですが。。
さらに format.html の後ろに {} がありますが、 これは format.html() への引数としては無名関数を渡していると思ってください。
また、46行目の format.json { render :show, status: :ok, location: @article } は、
シンボル(先頭にコロンを付ける)、名前付き引数(末尾にコロンを付ける)が同時に使われています。
イメージ的には、
render(:show, 引数status = ok, 引数location = @article)
を実行する無名関数を、format.json() の引数として渡している感じになります。
ちなみに、http://localhost:3000/articles.json のように、後ろに .json をつけてアクセスすると、JSON形式で表示されます。
また、31行目にある notice は、リダイレクト先のビューの中で使用できます。
class ArticlesController < ApplicationController
  before_action :set_article, only: [:show, :edit, :update, :destroy]

  # GET /articles
  # GET /articles.json
  def index
    @articles = Article.all
  end

  # GET /articles/1
  # GET /articles/1.json
  def show
  end

  # GET /articles/new
  def new
    @article = Article.new
  end

  # GET /articles/1/edit
  def edit
  end

  # POST /articles
  # POST /articles.json
  def create
    @article = Article.new(article_params)

    respond_to do |format|
      if @article.save
        format.html { redirect_to @article, notice: 'Article was successfully created.' }
        format.json { render :show, status: :created, location: @article }
      else
        format.html { render :new }
        format.json { render json: @article.errors, status: :unprocessable_entity }
      end
    end
  end

  # PATCH/PUT /articles/1
  # PATCH/PUT /articles/1.json
  def update
    respond_to do |format|
      if @article.update(article_params)
        format.html { redirect_to @article, notice: 'Article was successfully updated.' }
        format.json { render :show, status: :ok, location: @article }
      else
        format.html { render :edit }
        format.json { render json: @article.errors, status: :unprocessable_entity }
      end
    end
  end

  # DELETE /articles/1
  # DELETE /articles/1.json
  def destroy
    @article.destroy
    respond_to do |format|
      format.html { redirect_to articles_url, notice: 'Article was successfully destroyed.' }
      format.json { head :no_content }
    end
  end

  private
    # Use callbacks to share common setup or constraints between actions.
    def set_article
      @article = Article.find(params[:id])
    end

    # Never trust parameters from the scary internet, only allow the white list through.
    def article_params
      params.require(:article).permit(:data1, :data2)
    end
end
2行目の before_action で、show、edit、update、destroy の時に、66行目の set_article が実行され、@article にデータが入ります。
そのため、12行目の show では何も行っていません。また、ビュー側では、コントローラーの @article が直接参照できます。
27行目の article_params は、変数ではなく、71行目で定義されているメソッドです。。
29~37行目は、do ~ end は respond_to() の引数になります。無名関数を respond_to() に渡していると思ってください。
「|」に挟まれた format は、respond_to() の中から呼ばれる際の引数です。
format.html と format.json は、ファイル名っぽいですが、format オブジェクの html() を実行しています。
メソッド名が toHtml とかだと、括弧が省略されていてもわかりやすいと思うのですが。。
さらに format.html の後ろに {} がありますが、 これは format.html() への引数としては無名関数を渡していると思ってください。
また、46行目の format.json { render :show, status: :ok, location: @article } は、
シンボル(先頭にコロンを付ける)、名前付き引数(末尾にコロンを付ける)が同時に使われています。
イメージ的には、
render(:show, 引数status = ok, 引数location = @article)
を実行する無名関数を、format.json() の引数として渡している感じになります。
ちなみに、http://localhost:3000/articles.json のように、後ろに .json をつけてアクセスすると、JSON形式で表示されます。
また、31行目にある notice は、リダイレクト先のビューの中で使用できます。
3. app/views/layouts/application.html.erb
レイアウトファイルです。ヘッダーとフッターを定義します。
<%= yield %> の部分にメインのビューが出力されます。
<%= yield %> の部分にメインのビューが出力されます。
4. app/views/articles
レイアウトに挿入される各ページのビューが入っています。
edit.html.erb を見るとわかりますが、他のビューを挿入することもできます。
edit.html.erb を見るとわかりますが、他のビューを挿入することもできます。
5. app/assets/stylesheets/articles.scss
SCSS形式でスタイルシートを書くと、自動的にCSSに変換してくれます。
画面表示後にソースを表示すると、変換されたCSSを見ることができます。
画面表示後にソースを表示すると、変換されたCSSを見ることができます。
7. [補足] Rubyの動作確認
ブロック引数の動作確認です。
yield を使って、&proc と proc.call を省略する
def test(&proc)
  proc.call 123
end

ret = test do |value|
  value
end
p ret
123
yield を使って、&proc と proc.call を省略する
def test
  yield 123
end

ret = test do |value|
  value
end
p ret
123
def test
  yield    #test2() を呼び出す
end

def test2(p1, **args)
  if p1 == :value
    p args[:p2]
  end

  if p1 == :msg
    p args[:p3]
  end
end

test { test2 :value, p2: 123    , p3: 'Hello' }
test { test2 :msg  , p3: 'Hello', p2: 123 }
123
"Hello"